When you tap a button in a Flutter app, it feels instant. But behind that simple interaction lies a powerful and well-optimized pipeline.
In this article, we’ll break down exactly what happens inside Flutter from the moment you tap the screen to when the UI updates — in a way that’s easy to understand and useful for interviews.
Why This Matters
Understanding Flutter’s internal flow helps you:
- Build high-performance apps
- Debug UI issues more effectively
- Explain architecture clearly in interviews
- Write more optimized and scalable code
The Big Picture
At a high level, Flutter processes a tap like this:
User Tap → OS → Embedder → Engine → Framework → UI Update
Now let’s go deeper.
Step 1: User Tap
Everything begins when a user taps on the screen.
This is a physical interaction detected by the device’s hardware.
Step 2: Touch Sensor Detects Input
The touch sensor converts the tap into an electrical signal.
It captures:
- The exact position (x, y)
- Timing of the interaction
Step 3: Operating System Processes the Event
The OS (Android or iOS):
- Interprets the signal
- Identifies the gesture (tap, swipe, long press)
- Sends the processed event to Flutter
Step 4: Flutter Embedder (Bridge Layer)
The Flutter Embedder acts as a bridge between the OS and Flutter.
Its role:
- Receives events from the OS
- Passes them to the Flutter Engine
Think of it as the communication layer.
Step 5: Flutter Engine (Core Processing)
The Flutter Engine is written in C++ and handles:
- Input processing
- Dart runtime execution
- Graphics rendering (via Skia)
It forwards the event to the Flutter Framework.
Step 6: Flutter Framework Takes Over
The Flutter Framework (written in Dart):
- Handles UI logic
- Processes gestures
- Manages widget lifecycle
Step 7: Gesture Detection
Flutter determines what kind of interaction occurred:
- Tap
- Long press
- Drag
This ensures the correct response is triggered.
Step 8: Hit Testing
Flutter now asks:
“Which widget was tapped?”
It checks its internal tree structure to find the exact UI element under the touch position.
Step 9: Target Widget Identified
The framework identifies the widget (e.g., a button) that should respond.
Step 10: Callback Execution
The widget’s action is triggered.
This is where your app logic runs:
- Navigation
- API calls
- State updates
Step 11: State Update
If the UI needs to change, the app updates its state.
This tells Flutter:
“Something changed — rebuild the UI.”
Step 12: Widget Rebuild
Flutter rebuilds only the necessary parts of the UI.
This selective update is why Flutter apps are so fast.
Step 13: Layout Phase
Flutter calculates:
- Size of each widget
- Position on screen
Step 14: Paint Phase
Flutter prepares drawing instructions:
- Colors
- Text
- Shapes
These are converted into a layer tree.
Step 15: Skia Renders the UI
Flutter uses Skia, a high-performance graphics engine, to convert UI into pixels.
Step 16: GPU Renders the Frame
The GPU takes pixel data and renders it on the screen.
This ensures smooth animations and transitions.
Step 17: Screen Update
Finally, the updated UI appears.
All of this typically happens within ~16 milliseconds, maintaining smooth 60 FPS performance.
Performance Insight
Flutter avoids unnecessary work by:
- Rebuilding only changed widgets
- Using efficient rendering via Skia
- Leveraging GPU acceleration
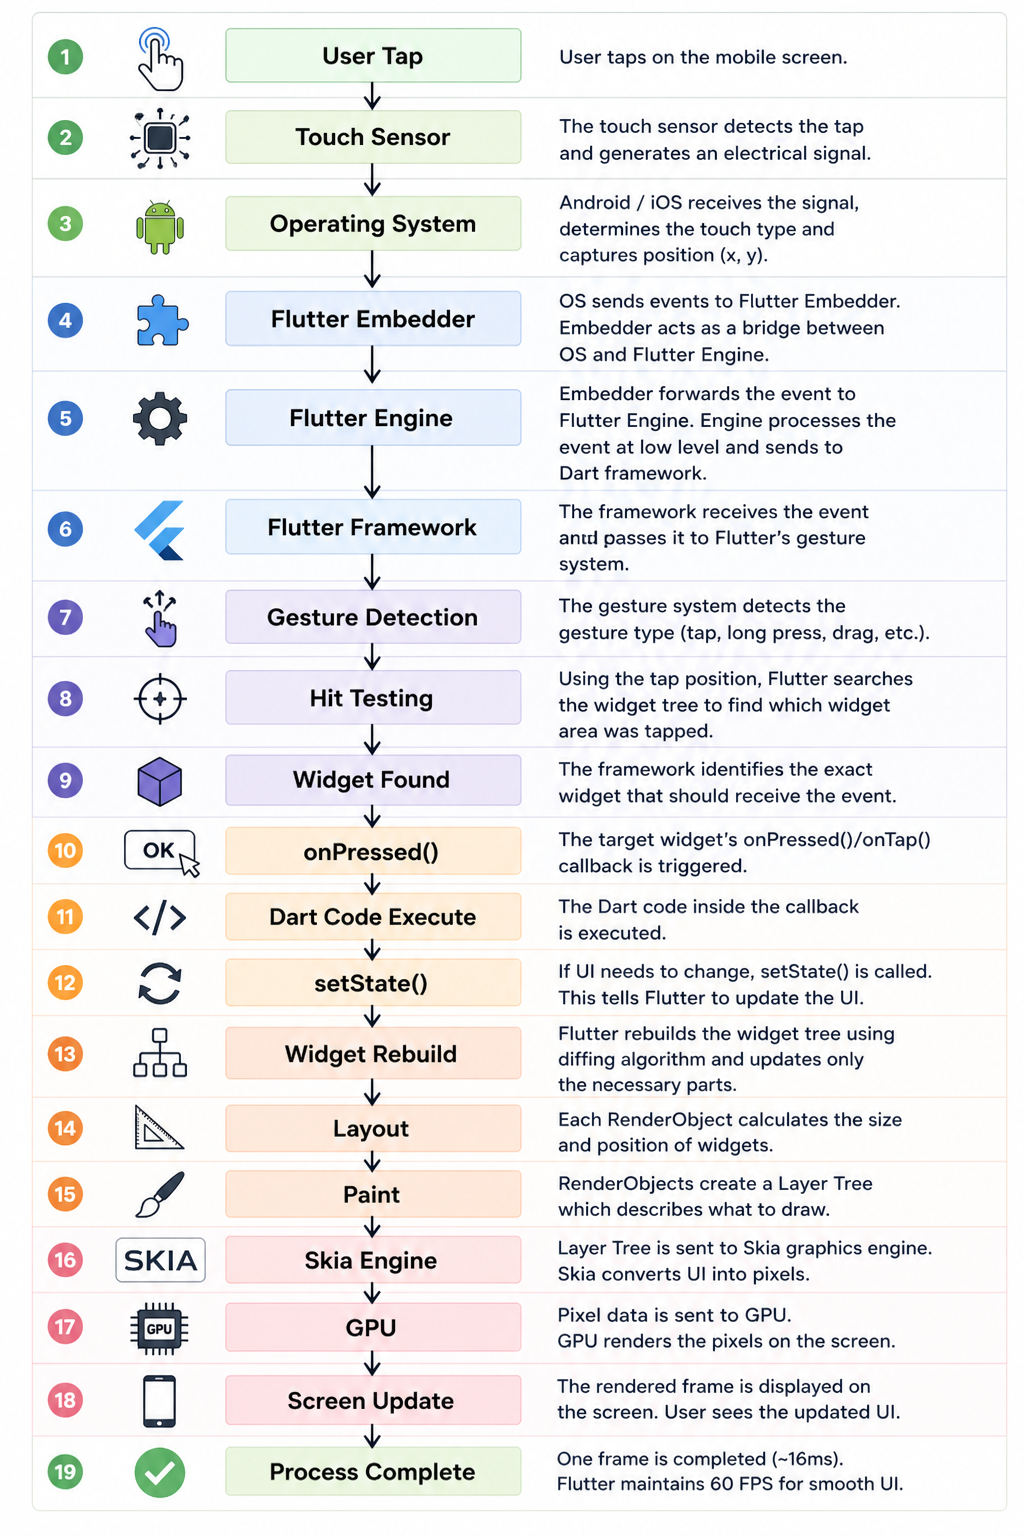
Final Flow Summary
User Tap → Touch Sensor → Operating System → Flutter Embedder → Flutter Engine → Flutter Framework → Gesture Detection → Hit Testing → Widget Found → Callback → State Update → Widget Rebuild → Layout → Paint → Skia → GPU → Screen Update